Friday, September 30, 2011

pesto breadsticks


These are buttery and flaky and lovely. They kind of beg to be eaten alongside spaghetti and meatballs and then dipped in the leftover sauce. I ate them with salad and pizza, and I was still very content.

After the puff pastry defrosts, the entire preparation takes about 5 minutes and then into the oven they go. More time for talking with friends about upcoming dinner party plans (I have a very excited one coming up that I shall be writing about in due time).


The pesto filling was mellow and savory. I want to try this again but use a garlicky, pungent filling. Maybe a take on a chimichurri (parsely, garlic, vinegar, red pepper), but with goat cheese instead of oil. This recipe needs more of a creamy spread, not an oily spread.

Pesto Breadsticks
(makes 8)

2 sheets of puff pastry, thawed
1/4 cup pesto
1/4 cup parmesan
1 tablespoon mascarpone
pinch of salt

Preheat oven to 425 degrees.
Roll out both sheets of puff pastry to 1/8 inch thick. Mix together pesto, parmesan, and mascarpone. Spread mixture over one sheet of puff pastry and then top with other sheet. Press sheets together tightly. Cut into 8 even strips. Holding both ends, twist each strip and place on a lined baking sheet. Bake 23-25 minutes. Let cool for 5 minutes before eating.


Thursday, September 29, 2011

my new favorite kitchen gadget

(image via Crate and Barrel)

We recently acquired a few kitchen gadgets through a little event called our wedding. Josh had been wanting the Breville electronic water kettle for a while. This was a tough sell for me. Some kitchen gadgets seem entirely execessive to me - why do you need a garlic press when you have a knife? I was hesitant about the kettle - we already have a pot that boils water just fine, thank you.

But this kettle is the most convenient thing ever. It boils water in record time - about 2 minutes. It's electric and turns off once the water is heated. So you don't have to worry about water boiling over on the stove in the morning when you're in the bathroom blowdrying your hair or whatever. I'm sold.

And, I now drink tea (decaf) twice a day because it's just that easy. I feel so healthy already.

Wednesday, September 28, 2011

dinner at downtown's church & state

I went to dinner earlier this week at Church & State with my friend Ashley. I’ve been once but long before Chef Jeremy Berlin took over.  The food and wine were fantastic and appropriately priced. It’s the perfect spot for a date and has this romantic tone to it. We stuck with wine, but I’ve heard their cocktails are extremely drinkable.


The bread and butter were divine. I seriously love it when bread comes out hot – the butter just spreads so well! Each table has a little basin of coarse sea salt. Sprinkle some on the bread and butter. Utter perfection. (Josh has been to Church & State umpteen times and would like me to mention that their appetizer of bread with French Normandy butter will blow your mind….we just stuck with the free bread and we were very happy).


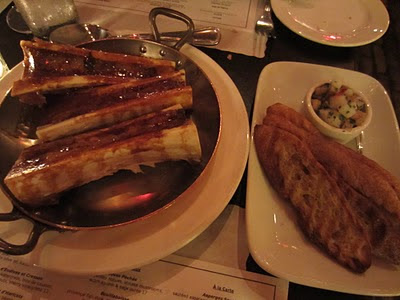
Ashley and I were feeling very adventurous (maybe it was the rose we were drinking on empty stomachs…) and ordered the bone marrow appetizer to split. I will admit, the consistency is a tad bit “jiggly.” But once I got over that, the taste was insanely good. Just imagine you’re eating butter, but really really luxurious butter. Spread on garlic toast. Topped with radish salt. Seriously so good.


Next up was the fig and caramelized onion tart. Oh. My. Goodness. Hands down, this was our favorite pick of the night. It was oozing in delicious cheese and the crust was thin and crispy so you could focus on the toppings and not the breadiness below.


We rounded out the night with the veal breast with pea puree, turnips, and cipollini onions. The veal was so soft you didn’t even need a knife, and it paired perfectly with the fresh peas and slightly bitter onions and turnips.

1850 Industrial St, #100
Los Angeles 90021
213 405 1434

Tuesday, September 27, 2011

seasons eatings


Although it’s a balmy 80 degrees in Los Angeles today, the calendar swears it’s time for Autumn. I’ve been scouring my cookbooks and online blogs for seasonal recipes, so I’m prepared once the thermostat drops. We’re planning a bunch of dinner parties in the next couple of months (Halloween, my birthday, Thanksgiving…), and I need to test out some recipes. I’m thinking short ribs could be a delicious option for the Halloween party (plus short-ribs sounds like an appropriate dish for the Holiday).

Here’s some of favorites I’ve tagged:

The Pioneer Woman's Short Ribs with Wine and Cream
The Beerista's Butternut Squash and Spinach Gratin with Autumn Maple Sauce
Smitten Kitchen's Balsamic Glazed Brussel Sprouts with Pancetta
Tartlette Saffron Pumpkin Macarons
Barefoot Contessa's Perfect Roasted Chicken
The Amateur Gourmet's Mushroom Bourguignon

Monday, September 26, 2011

make your own baked eggs brunch

(inhaling cookies after the race)

Josh completed the Los Angeles triathlon yesterday (yes, that’s swimming, biking, and running!). We had some family and friends over to celebrate after the race, and I set up a baked eggs bar. I recommend it for a simple, interactive brunch. I prepped everything in advance – so all that was left to do was assemble your own egg dish. Then we just popped them in the oven. More time for munching on mini cinnamon rolls and drinking mimosas.

(my baked eggs - i went all veggie)

I prepped the ingredients in the morning, after I dropped off Josh at Venice Beach for the swim. But you could just as easily prepare everything the night before.

Roasted Tomatoes:
4 tomatoes
1 tablespoon herbs de provence
½ teaspoon pepper
Cut tomatoes into large chop. Sprinkle with pepper and herbs de provence. Roast at 400 degrees for 30 minutes.

Roasted Mushrooms:
8 oz cremini
8 oz shitake
1 tablespoon soy sauce
Clean mushrooms with damp paper towel. Slice creminis in half and shitakes in quarters. Roast at 400 degrees for 20 minutes.

Sauteed Spinach:
1 bag of spinach
1 tablespoon of butter
Melt butter in sauté pan over medium heat. Add all of spinach and cover with lid until wilting begins (about 1-2 minutes). Remove lid and stir until spinach is cooked down (about 1 more minute).


(roasted mushrooms, roasted tomatoes, sauteed spinach)

I also bought some pesto, prosciutto, and goat cheese and assembled them on a platter for guests to add to their dish.

(prosciutto, pesto, goat cheese)

To assemble the eggs: Place ½ tablespoon of butter in the bottom of inidivudal baking dish (we use miniature crocks, but you could use ramekins). Have everyone dish in their ingredients. Crack eggs into separate glass bowls and gently pour atop the other ingredients. Finish with a ½ ounce or so of heavy cream. Cover with foil and bake at 375 degrees until whites are set (about 25-30 minutes).


Chris had the fabulous idea of writing everyone’s names on the foil so we could figure which dish belonged to each person. Genius.

We served the eggs with toasted English muffins, miniature cinnamon buns (from Trader Joe’s freezer section), fruit salad with blackberries, strawberries, and figs. Oh and blood orange mimosas – a very essential part of brunch.

Friday, September 23, 2011

fall into autumn macarons at bottega


I swoon over French macarons. They’re so delicate and sweet and divine. I’ve tried making them once before, and I can now truly appreciate the effort that goes into making one of these little cookies (and I can understand why each one costs at least $1 wherever you go).


After dinner at Mas Malo last night (I’m such a sucker for the potato and cheese tacos), I headed over to Bottega Louie for a sweet fix. I was pleasantly surprised to see they had revamped their flavors for Fall. They still have some of the stand-by favorites - Tahitian Vanilla, Earl Grey, Rose, Raspberry – but they’re also serving Cinnamon Caramel and Chestnut Apricot. The Chestnut Apricot was my favorite of the newbies - Autumn spices and a tiny bit tangy. Plus the gift box ($10 for 5) is just so cute. It seriously makes the best hostess gift. Or "thanks for watching my dog for the weekend" gift – Thanks, Natalie :)

Thursday, September 22, 2011

sea salt caramels

(bequet celtic sea salt caramels via chelsea market baskets)

I am quite obsessed with salted caramels. I love the pairing of the buttery and chewy caramel with delicate flakes of salt. They are seriously. so. good. Since I am (clearly) head over heels for these little candies, I’ve tried a bagillion different varieties.

I always grab both Trader Joe’s holiday versions: the simple salted caramels and the chocolate covered fleur de sel caramels. Both are insanely affordable, which is a huge plus (especially considering some fancy salted caramels can run you $2 a piece – eek!). But I find that TJ’s salted caramels are a bit too hard and the chocolate covered ones are actually too rich for me (crazy, I know), probably because of the use of dark chocolate.

I love to try the freshly made, butcher-paper-wrapped salted caramels from bakeries around LA or on vacations. I grabbed a seriously giant caramel from Miette in San Francisco this past weekend. It took 4 bites to get through that sucker, and it was delicious, but just didn’t have enough salt for me. Sigh.

I’ve even attempted at making my own salted caramel. Well, I made a salted caramel sauce, not the actual candy. And it was pretty insanely good, if I do say so myself. (I completely attribute the sauce’s wonderful-ness to one of my favorite food bloggers – Smitten Kitchen). Even though I sat there – shamelessly – eating spoonfuls of salted caramel out of the fridge, I missed chewing on the real candy.

I finally came across my favorite salted caramel – Bequet Celtic Sea Salt Caramel! And, being the nice person I am, shared it with ALL of our wedding guests as our party favors. Seriously, almost half of our guests have expressed their undying love for these candies and have asked me how they can immediately order a shipment of caramels for their household. So I thought I would also share this caramel with all of you fine people. Some Whole Foods sell them, but not all. But you CAN buy them directly from their website. You will not be sorry. My advice: Order way more than seems reasonable. I have easily taken down a dozen in one sitting.

Wednesday, September 21, 2011

San Francisco

(the ferry building)

The trip to San Francisco was wonderful. The city was hit with a true Indian summer - low 80's for the three days we were up there. Our days were jam packed, but we managed to get in plenty of delicious visits to restaurants and bars around the bay area. Two of my favorite stops aren't pictured below, but you have to stop by if you're in the city: a Ward 8 cocktail at Rickhouse and a simple, but lovely, frozen yogurt with wildflower honey from Fraiche.

(dinner at mission chinese food - spicy chicken wings with mala...the schezwan spice that numbs your mouth)

(bright and early breakfast at blue bottle - granola with strawberries and peaches and a kyoto iced coffee)

(wandering around the ferry building while waiting for my lunch)

(lunch at frog hollow - braised tofu, mashed avocado, peach chutney)

(dessert at A16 - sea salt chocolate budino and peach buttermilk gelato)

(pizza of the day at berkeley's cheeseboard collective- gypsy pepper, onion, french goat cheese, and fresh herb)

Thursday, September 15, 2011

TGIF

(chocolate croissant from Tartine via Munchums)

I am so excited its Friday! I have a jam packed weekend that includes a birthday dinner party for two of my best friend's Chris and Natalie. Their dinner parties always have amazing food, cocktails, and (especially!) dessert.

We'll also be jetting off to San Francisco. I can't wait for a chocolate croissant from Tartine Bakery, dinner at Mission Chinese Food (voted one of the best new restaurants by Food and Wine), and cocktails at Bourbon and Branch.

Hope you all have a lovely weekend!

Wednesday, September 14, 2011

for the love of n'ice cream


I am SUCH an ice cream addict. I think it's somewhat hereditary (my grandma loved ice cream and my mom has been known to take down 4-5 scoops in a sitting, easily). On our honeymoon, I made Josh visit every famous gelateria in Rome and Florence (his life is so rough). At times we enjoyed 8 scoops of gelato in one day.

Last night, I headed down to Venice Beach to grab dinner with some girls from work. Venice is kind of a trek for me, but they all agreed to head over to one of my favorite LA gelato shops afterwards, so I was in.

I've been to N'ice Cream several times. They have 3 locations (Venice boardwalk, Abbot Kinney, and The Market @ Santa Monica Place). I've tried tons of their flavors, but always end up ordering the Salted Caramel. It's ridiculously good. Their recipe is especially salty (in a good way) and the gelato is rich and luxurious. Plus, it's organic and made fresh daily. Do yourself a favor and go get a scoop. Like, now. Really.

Tuesday, September 13, 2011

asian cucumber salad


This salad is refreshing, simple, and inexpensive. It's perfect to bring to a potluck because you can serve it cold or at room temperature, and the more it sits and marinates in the sauce, the better. I like the texture of the thicker cut cucumbers, but if you're more of a thin-cut, "sunomono-style" person, then shave the cucmbers paper thin.
What you need (makes 8 side dishes):

5 cups of chopped cucumbers **
1/4 cup sesame oil
2 tablespoons soy sauce
1 teaspoon hot chili oil
1/2 cup rice wine vinegar
**I used a mix of 7 persian cucumbers and 2 english cucumbers. You can leave the skins on the persian cucumbers (just rinse them), but I prefer to peel and de-seed the english cucumbers.
Simply chop all the cucumbers, mix together all the liquid ingredients, and pour the dressing over the cucumbers. Let sit in fridge for at least 2 hours.


Sunday, September 11, 2011

Sour Beer Love


This past weekend we headed down to Beachwood BBQ for its Sour Fest - a week long sour beer event. Josh and I tried 11 different sour beers and made sure to order every single one of the Cascades on tap. Our favorites were the Eric's Ale (New Belgium), The Vine (Cascade), Bourbonic Plague (Cascade), and Sour Lavender (Craftsman).

If you're interested in trying a sour beer (they're amazing!), head over to a local Whole Foods. I recommend Duchesse De Bourgogne as a starting off point.

Friday, September 9, 2011

homemade spinach and ricotta ravioli

I've always been terrified of making homemade pasta. I thought it required hours of labor, masterful hand crafting, and live yeast (which I have never worked with and am slightly grossed out by, to be honest).

So, I
was thrilled to learn that pasta is actually a pretty quick process and only requires three ingredients – flours, eggs, and olive oil. You will need a pasta maker too. Our cooking teacher swore by this model, which we purchased at Crate & Barrel. We love it – it’s compact and reasonably priced. She lectured us that “you do NOT wash a pasta maker, just wipe down with a towel.” (Envision her saying that in an Italian accent and you’ll take the statement very seriously.) If you get the maker too wet, it can rust and it won’t roll out your pasta properly. I’m just going to take her word for it.

So for a 2-person entrée portion or a 4-person appetizer portion of ravioli (spinach and ricotta in this case), here’s what you need:

Pasta:
100 grams of flour
1 egg
1/3 an egg of olive oil

Filling:
100 grams of frozen spinach, cooked and drained
300 grams of ricotta
1 egg
A generous handful of nutmeg, freshly grated if available
Salt and pepper to taste

First, prepare the filling. You can let it sit in the fridge while you make the pasta and the flavors will all blend together. Heat the frozen spinach. (I find that about a half a bag equates to 100 grams once you’ve cooked and drained it.) Once the spinach is cooked through, place it in the center of a thin dish cloth and squeeeeeeeze all the excess water out. Mix 100 grams of this drained spinach with the ricotta, nutmeg, salt, and pepper. We were taught to use a generous amount of nutmeg. I usually grate about half of one nutmeg (see picture below). Taste the mixture and add more spices to your liking. Mix in egg. Store in fridge until pasta is ready.


Pour flour onto a clean surface. Form a basin in your flour mound so that you can fill it with your liquid ingredients. Crack an egg into the basin of your flour mound. Using an egg shell half as your measuring device, measure 1/3 an egg of olive oil. This equates to about 2/3 the way up your egg shell half, give or take depending on how neatly you cracked your egg.

Carefully and with small, circular movements, break the yoke of the egg and mix the oil, egg, and flour together. Try to keep all the liquid ingredients inside the basin until enough flour is mixed in so they won’t run all over your surface. If they do (and don’t worry, this has happened to me a bunch of times), just toss some of your flour onto the liquid, so it stops running away, and mix it into your dough.

Once all the ingredients are mixed together. Knead the dough until it is springy to your touch, about 3-5 minutes. In case you have no idea what kneading means: Use the heel of your hand to flatten the dough out and then fold it back into a dough ball. This continues to mix the ingredients and activates the gluten in the pasta.

Set your pasta maker to setting 1. Roll your pasta through this setting a couple times. You may have to manipulate the shape of the pasta at first to get it through the maker. Move the setting up to 2 and roll your pasta through. Continue through this process until your pasta is sheer enough you can see your hand through it (usually by setting 6 or 7).

Lay the pasta on a clean surface. Spoon 1 tablespoon of filling on the center of the pasta. Repeat this down the entire length of the pasta, about 2 fingers apart. Gently fold the pasta over. Using your fingers, push the two sides of the pasta together while pressing all the air away from the filling. (Air in the filling could cause the ravioli to burst in the boiling water.) Cut the ravioli.


If you’re going to eat the ravioli immediately, place them in salted boiling water for 3-4 minutes. If you want to cook the ravioli later, simply parboil them now (boil them for 2 minutes) and the drain them and store them in the fridge. When you’re ready to cook them, boil then for 3 minutes and they’re good to go!